This article will introduce the core concepts of React from scratch. Here is a reference outline~
- React
- What is React
- Why use React
- Project Preview
- JSX
- Styles
- Components
- props
- Class Components
- State
- Event Handling
- Lifecycle
- More
- Scaffolding
- State Management and Routing
Without further ado, let's get started~
React#
What is React#
Official definition: A JavaScript library for building user interfaces
From this definition, we should understand that React itself is only responsible for building user interfaces, while large React projects generally closely integrate with its ecosystem (Routing: React-Router, State Management Library: Redux, etc.) to achieve functionality. This article mainly focuses on the core concepts of React.
Why use React#
- Virtual DOM: We all know that frequent DOM manipulation in JS is very costly, and React's pioneering virtual DOM allows for DOM manipulation at the JS level, greatly improving application efficiency.
- Reusable Components: The popularity of React has driven the idea of componentization, which is fundamentally about reusability. Compared to traditional web development models, it is also easier to maintain, significantly improving development efficiency.
- Maintained by Facebook: React is backed by Facebook, with many excellent developers maintaining and iterating it. The community is also very active, and most problems encountered during development can be quickly resolved.
- Reality: The last point is the current situation in the domestic market, where major companies' tech stacks are basically based on React. Therefore, if you want to align with companies, React is an essential skill.
Project Preview#
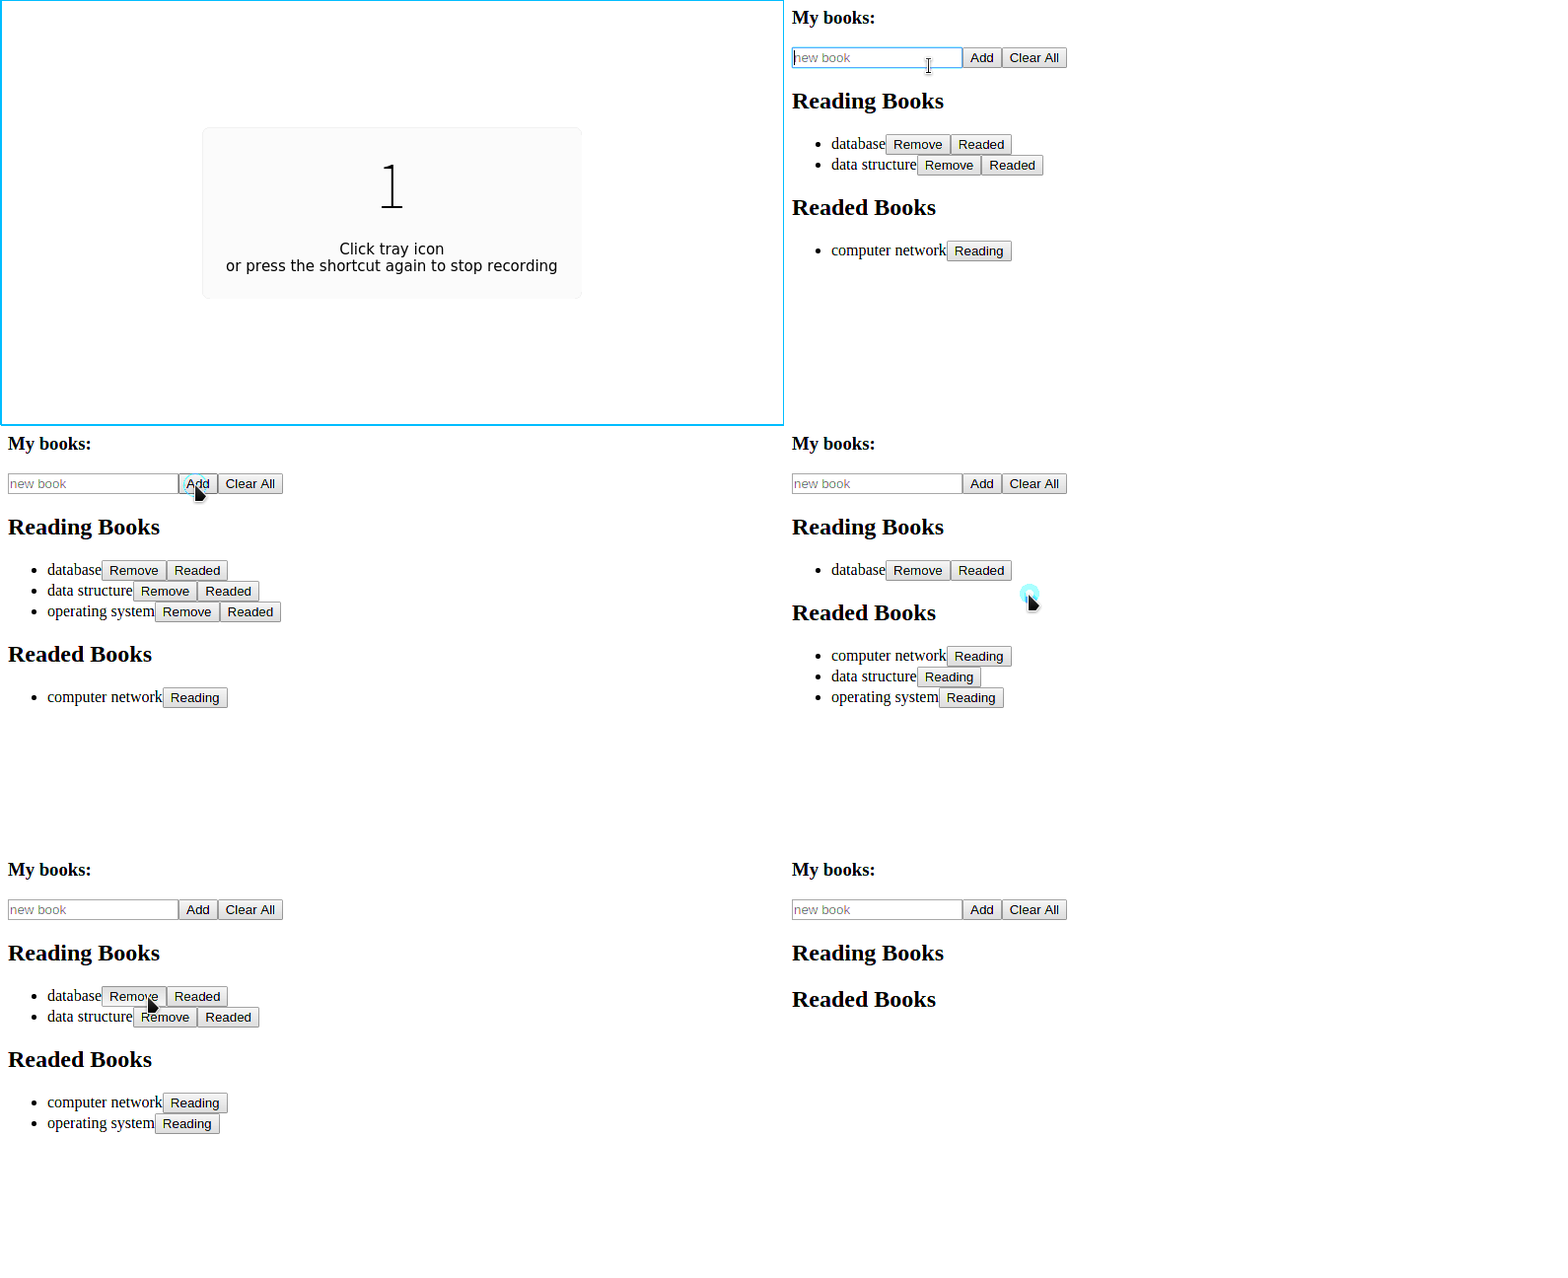
First, let's take a look at the final project effect and think about how to achieve it using native JS?
Initial empty template:
<!DOCTYPE html>
<html lang="en">
<head>
  <meta charset="UTF-8">
  <meta name="viewport" content="width=device-width, initial-scale=1.0">
  <meta http-equiv="X-UA-Compatible" content="ie=edge">
  <title>Document</title>
</head>
<body>

</body>
</html>
JSX#
Let's first look at how React builds interfaces and renders elements:
- The syntax of React is JSX, which is a syntax that mixes JavaScript and HTML.
Here we will use external links to add the two most basic links for a React project:
	<script crossorigin src="https://unpkg.com/react@16/umd/react.development.js"></script>   // core of react
	<script crossorigin src="https://unpkg.com/react-dom@16/umd/react-dom.development.js"></script>  // react-dom for browser (DOM) rendering
At the same time, to directly use JSX syntax, we also need to include the external link for babel:
<script src="https://cdnjs.cloudflare.com/ajax/libs/babel-standalone/6.26.0/babel.min.js"></script>

// script tag with type
<script type="text/babel">
// coding....
</script>
Then let's write the first line of React code:
ReactDOM.render(<h1>Hello React!</h1>, document.getElementById('app'));
Refresh the browser:

The ReactDOM object comes from react-dom, and here we call its render method. The first parameter is the element to be rendered, and the second is the actual DOM object, successfully rendering the JSX element onto the page.
We can see that the JSX syntax is actually very similar to HTML. What about CSS?
Styles#
Inline styles:
ReactDOM.render(<h1 style={{backgroundColor: 'lightblue'}}>Hello React!</h1>, document.getElementById('app'))
External styles:
const h1Style = {
    backgroundColor: 'lightblue'
}

ReactDOM.render(<h1 style={h1Style}>Hello React!</h1>, document.getElementById('app'))
PS: If using CSS class selectors, the JSX syntax is className (to distinguish it from ES6's class).
Learning these few methods is sufficient for now.
Components#
The JSX we just wrote directly in the render method, when your JSX elements become complex, you need to define a Component separately. Let's first look at the syntax for stateless components:
function App () {
  return (
    <div>
      <h1>Hello React!</h1>
      <p>react is so awesome!</p>
    </div>
  )
}

ReactDOM.render(<App />, document.getElementById('app'))
Refresh the browser:

Here it is important to note that the returned component must be contained within one single outer tag.
Next, let's write something interesting:
function App () {
  const books = ['dataBase', 'data structure', 'computer network']
  return (
    <div>
      <h3>My books: </h3>
      <ul>
        {books.map(book =>
          <li>{book}</li>
        )}
      </ul>
    </div>
  )
}

ReactDOM.render(<App />, document.getElementById('app'))
We define a books array and then use the ES6 map method inside the function component to loop through and render the corresponding book elements.
Refresh the browser:
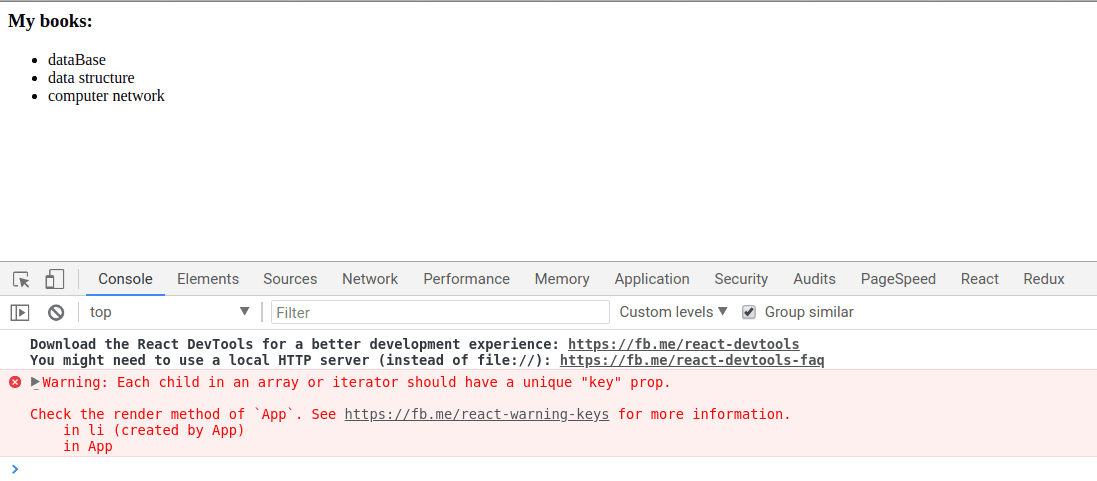
First, we can see three li elements appear on the interface, but more noticeably, there is a prominent error in the console. This error message is very important, meaning that each element produced in the loop needs to have a key. This way, React can recognize the addition, modification, and deletion of members in the list when the list changes (diff algorithm), leading to better performance. Therefore, we use the second parameter of map to add the corresponding key:
function App () {
  const books = ['dataBase', 'data structure', 'computer network']
  return (
    <div>
      <h3>My books: </h3>
      <ul>
        {books.map((book, i) =>
          <li key={i}>{book}</li>
        )}
      </ul>
    </div>
  )
}
Refresh the console, and the error no longer appears.
Here we can also find that the looped list inside the App component is more suitable to be extracted into a separate list component for better reusability:
function BookList () {
  return (
    <ul>
      {books.map((book, i) =>
        <li key={i}>{book}</li>
      )}
    </ul>
  )
}

function App () {
  const books = ['dataBase', 'data structure', 'computer network']
  return (
    <div>
      <h3>My books: </h3>
      <BookList />
    </div>
  )
}
However, we have clearly discovered another problem: the books array is defined inside the App component. How can the BookList component access its value?
props#
The above problem is how to pass values between parent and child components. A straightforward idea is to pass some custom parameters when placing the child component inside the parent component:
function App () {
  const books = ['dataBase', 'data structure', 'computer network']
  return (
    <div>
      <h3>My books: </h3>
      <BookList list={books} />
    </div>
  )
}
Then we can capture the passed parameters inside the BookList child component:
function BookList (props) {
  console.log('props: ', props)
  const books = props.list
  return (
    <ul>
      {books.map((book, i) =>
        <li key={i}>{book}</li>
      )}
    </ul>
  )
}
Refresh the browser:
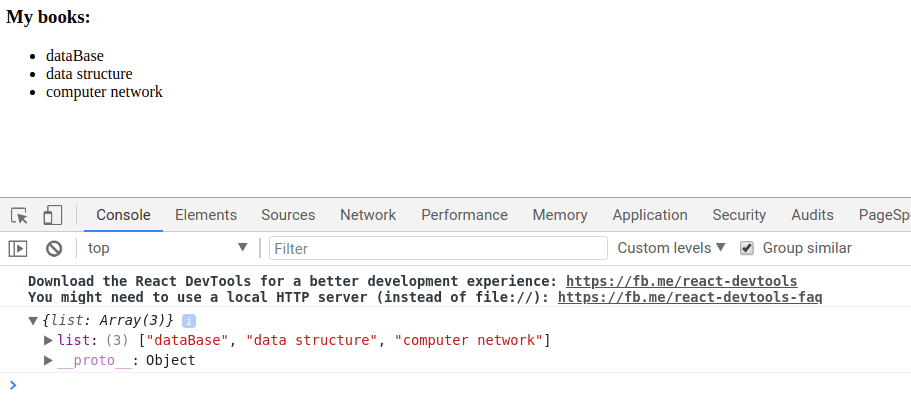
OK! This is props. We also printed this object to the console, which shows how data is passed between different components.
Now let's think about a new question: currently, the data is just silently passing through, and different components are merely displaying it. If we need to add or delete this data, how does React know that this data has been changed and update the UI in time?
Class Components#
Let's get to know another type of component provided by React—class components.
Class components come from the class in ES6. Here, let's look at how to rewrite the App component as a class component:
class App extends React.Component {
  constructor (props) {
    super(props)
    this.state = {
      books: ['dataBase', 'data structure', 'computer network']
    }
  }
  render () {
    return (
      <div>
        <h3>My books: </h3>
        <BookList list={this.state.books} />
      </div>
    )
  }
}
React.Component is a generic class provided by React that encapsulates all the implementation details required for React classes. Class components are implemented by inheriting it and redefining the render method to define the returned component elements.
State#
We can see that the original books array has been placed in the constructor function as the internal state of this class component:
this.state = {
	books: ['dataBase', 'data structure', 'computer network']
}
The state is bound to the class using this, allowing us to access state throughout the component. Each time we modify the component's state, the component's render method will run again, meaning the component will re-render. So can we directly modify the state?
React has two important principles: one is unidirectional data flow, and the other is explicit state changes. The only way to change the state is through setState().
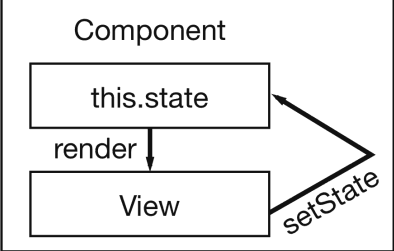
The component retrieves the latest state information during render for rendering. In the View layer, we update the state by calling setState, and then the component runs the render method again and updates the interface.
Let's try it out:
class App extends React.Component {
  constructor (props) {
    super(props)
    this.state = {
      books: ['database', 'data structure', 'computer network']
    }
  }
  render () {
    return (
      <div>
        <h3>My books: </h3>
        <BookList list={this.state.books} />
        <button onClick={() => this.setState({ books: ['Compilation principle', 'operating system'] })}>Change</button>
      </div>
    )
  }
}

Event Handling#
When the logic associated with setState becomes complex, including when we need to call setState between different components, from the perspective of reusability and maintainability, we need to extract event handling into custom functions for invocation. In React, it is recommended that event handling functions have the prefix handle, and listener functions have the prefix on:
class App extends React.Component {
  constructor (props) {
    super(props)
    this.state = {
      books: ['database', 'data structure', 'computer network'],
      input: ''
    }

    this.handleAddBook = this.handleAddBook.bind(this)
    this.handleRemoveBook = this.handleRemoveBook.bind(this)
    this.updateInput = this.updateInput.bind(this)
  }

  handleAddBook () {
    this.setState(currentState => {
      return {
        books: currentState.books.concat([this.state.input])
      }
    })
  }

  handleRemoveBook (name) {
    this.setState(currentState => {
      return {
        books: currentState.books.filter(book => book !== name)
      }
    })
  }

  updateInput (e) {
    this.setState({
      input: e.target.value
    })
  }

  render () {
    return (
      <div>
        <h3>My books: </h3>
        <input
          type="text"
          placeholder="new book"
          value={this.state.input}
          onChange={this.updateInput}
        />
        <button onClick={this.handleAddBook}>Add</button>
        <BookList
          list={this.state.books}
          onRemoveBook={this.handleRemoveBook}
        />
      </div>
    )
  }
}
handleAddBook and handleRemoveBook are for adding and modifying operations. Here, it is particularly important to emphasize the following three lines of code in the constructor:
this.handleAddBook = this.handleAddBook.bind(this)
this.handleRemoveBook = this.handleRemoveBook.bind(this)
this.updateInput = this.updateInput.bind(this)
When we want to call this.setState in a custom class method, this is undefined. Therefore, to allow the class component's this to be accessible in class methods, we need to bind this to the class methods. By placing the binding in the constructor, it will only run once when the component is instantiated, consuming less performance.
OK! In fact, at this point, we can basically complete the content presented in the project preview. Now try to make more improvements to achieve the following effect:
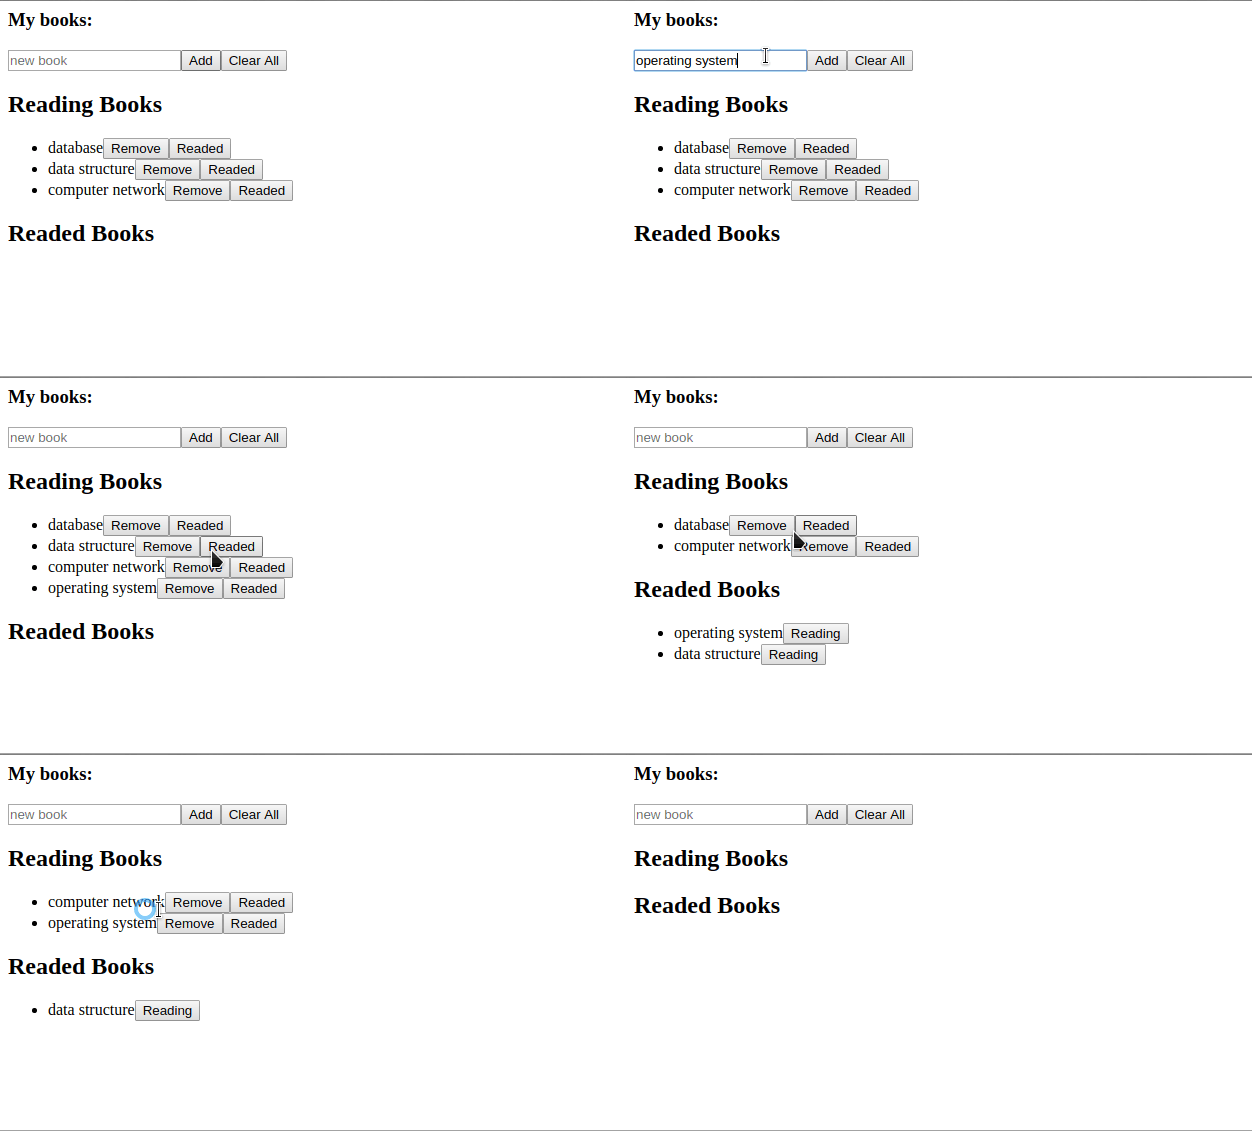
If you have completed it, you can refer to the following code:
function ActiveBooks (props) {
  return (
    <div>
      <h2>Reading Books</h2>
      <ul>
        {props.list.map((book, i) => (
          <li key={i}>
            <span>{book.name}</span>
            <button onClick={() => props.onRemoveBook(book.name)}>Remove</button>
            <button onClick={() => props.onDeactive(book.name)}>Readed</button>
          </li>
        ))}
      </ul>
    </div>
  )
}

function InactiveBooks (props) {
  return (
    <div>
      <h2>Readed Books</h2>
      <ul>
        {props.list.map((book, i) => (
          <li key={i}>
            <span>{book.name}</span>
            <button onClick={() => props.onActive(book.name)}>Reading</button>
          </li>
        ))}
      </ul>
    </div>
  )
}

class App extends React.Component {
  constructor (props) {
    super(props)
    this.state = {
      books: [
        {
          name: 'database',
          active: true
        },
        {
          name: 'data structure',
          active: true
        },
        {
          name: 'computer network',
          active: true
        }],
      input: ''
    }

    this.handleAddBook = this.handleAddBook.bind(this)
    this.handleRemoveBook = this.handleRemoveBook.bind(this)
    this.handleToggleBook = this.handleToggleBook.bind(this)
    this.updateInput = this.updateInput.bind(this)
  }

  handleAddBook () {
    this.setState(currentState => {
      return {
        books: currentState.books.concat([{
          name: this.state.input,
          active: true
        }]),
        input: ''
      }
    })
  }

  handleRemoveBook (name) {
    this.setState(currentState => {
      return {
        books: currentState.books.filter(book => book.name !== name)
      }
    })
  }

  handleToggleBook (name) {
    this.setState(currentState => {
      const book = currentState.books.find(book => book.name === name)

      return {
        books: currentState.books.filter(book => book.name !== name)
        .concat([{
          name,
          active: !book.active
        }])
      }
    })
  }

  updateInput (e) {
    this.setState({
      input: e.target.value
    })
  }

  render () {
    return (
      <div>
        <h3>My books: </h3>
        <input
          type="text"
          placeholder="new book"
          value={this.state.input}
          onChange={this.updateInput}
        />
        <button onClick={this.handleAddBook}>Add</button>
        <button onClick={() => this.setState({ books: [] })}> Clear All </button>
        <ActiveBooks
          list={this.state.books.filter(book => book.active)}
          onRemoveBook={this.handleRemoveBook}
          onDeactive={this.handleToggleBook}
        />
        <InactiveBooks
          list={this.state.books.filter(book => !book.active)}
          onActive={this.handleToggleBook}
        />
      </div>
    )
  }
}
At this point, you can write a few small demos to familiarize yourself with it. Now let's think about the last question:
- In many cases, data in the project needs to interact with the backend, which means there will be asynchronous operations. When the data has not yet been requested, we want to display a loading style, and after the request is completed, we update the interface. Where should this logic be placed?
Lifecycle#
For the above question, we actually hope to render the interface after the component has been mounted to the DOM. At the same time, for applications with many components, when a component is destroyed, we also need to release the resources it occupies. This is where two important functions in React's lifecycle come into play: componentDidMount and componentWillUnmount.
Let's get an overall feel for the execution process of lifecycle functions:
class App extends React.Component {
  constructor (props) {
    ......

    console.log('--constructor--')
  }

  componentDidMount () {
    console.log('--componentDidMount--')
  }

  componentDidUpdate () {
    console.log('--componentDidUpdate--')
  }

  componentWillUnmount () {
    console.log('--componentWillUnmount--')
  }

 ......

  render () {
    console.log('--render--')

    return (
      ......
    )
  }
}
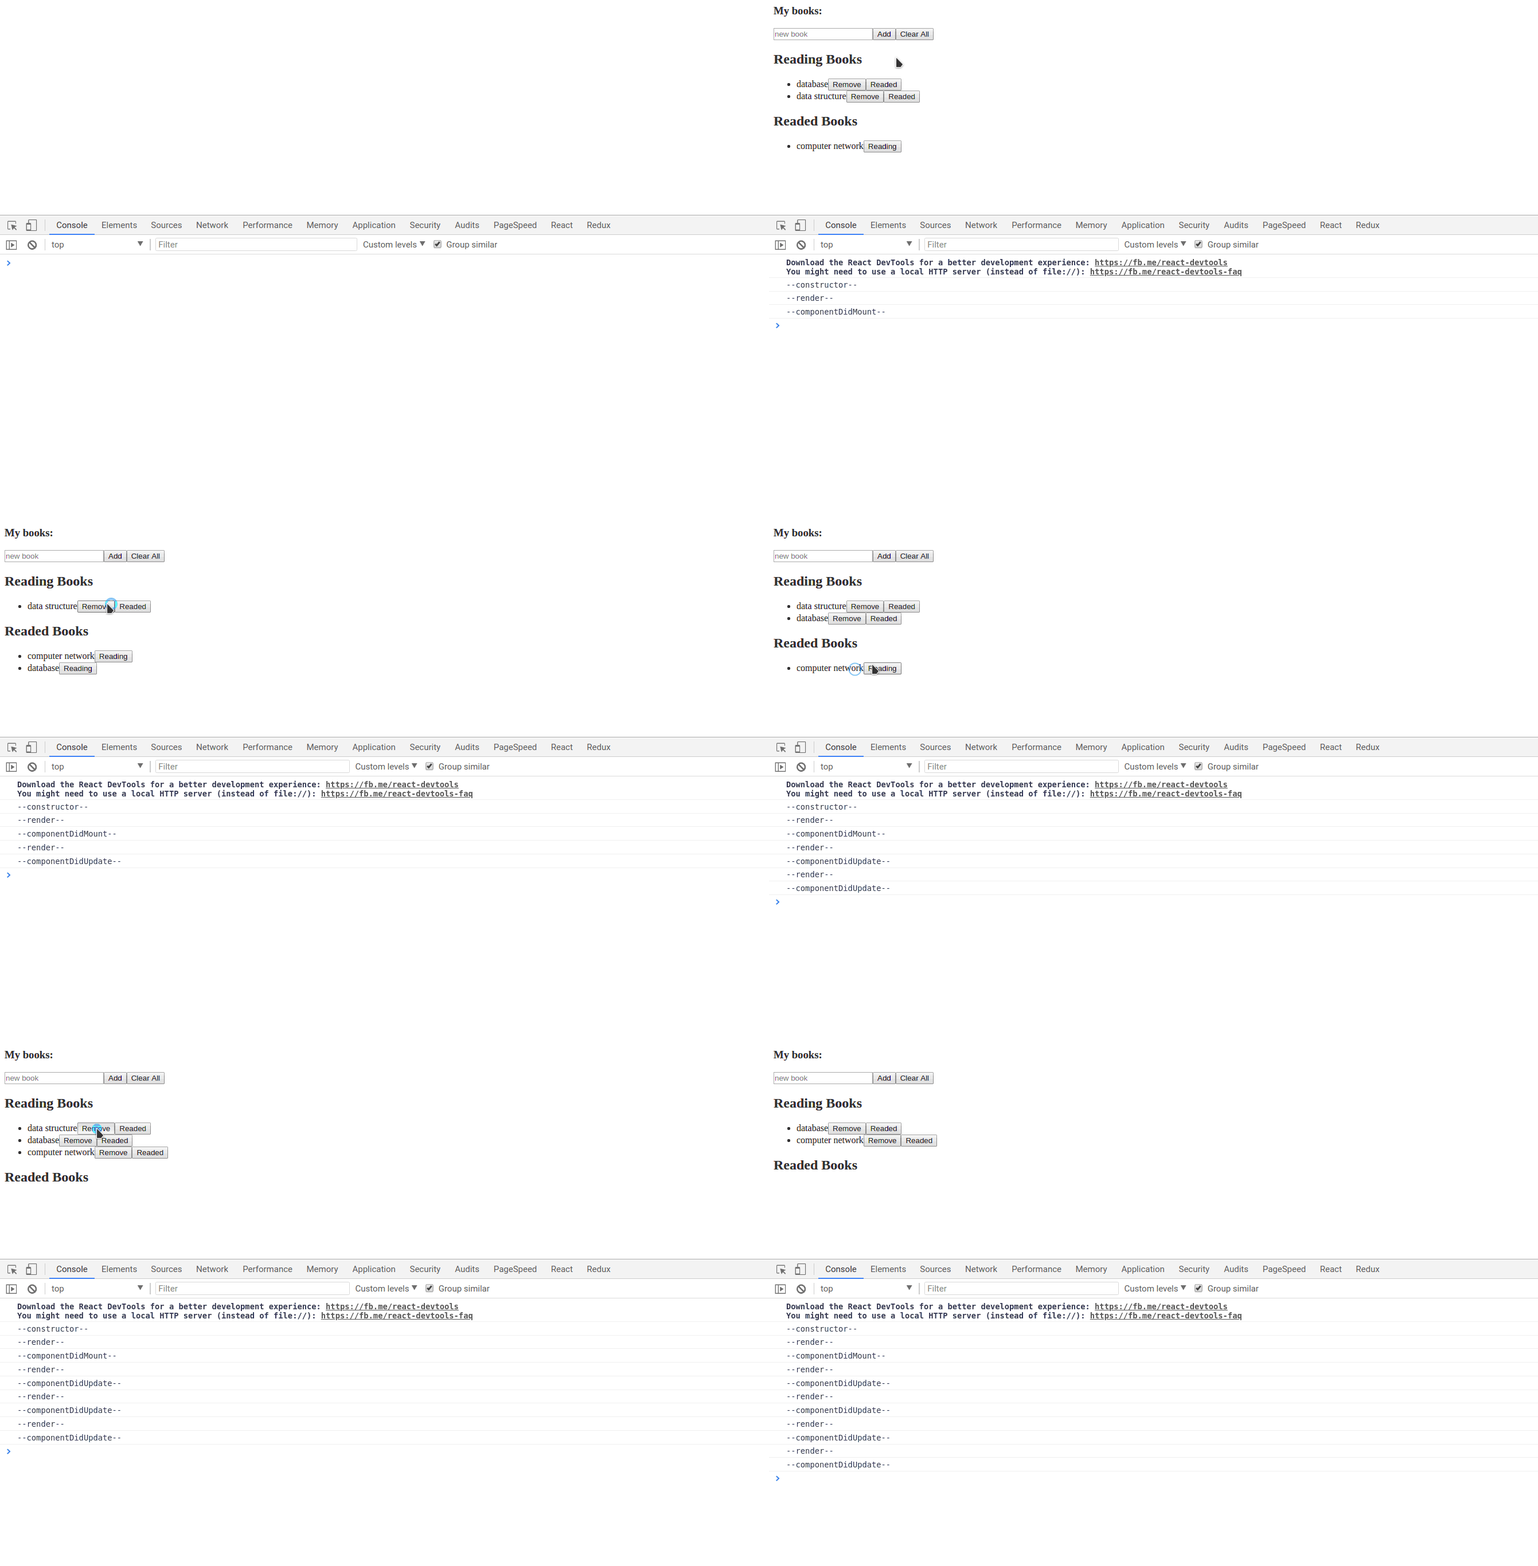
We can see that the entire lifecycle of the component is from constructor --> render --> componentDidMount, then the component updates and calls render again --> componentDidUpdate, and before the component is destroyed, componentWillUnmount is called.
Next, we will delve into using these functions:
Let's first manually simulate an API:
  window.API = {
    fetchBooks () {
      return new Promise((res, rej) => {
        const books =  [
          {
            name: 'database',
            active: true
          },
          {
            name: 'data structure',
            active: true
          },
          {
            name: 'computer network',
            active: false
          }
        ]
        setTimeout(() => res(books), 2000)
      })
    }
  }
Then call it in the componentDidMount function:
componentDidMount () {
  console.log('--componentDidMount--')

  API.fetchBooks()
    .then(books => {
      this.setState({
        books
      })
    })
}
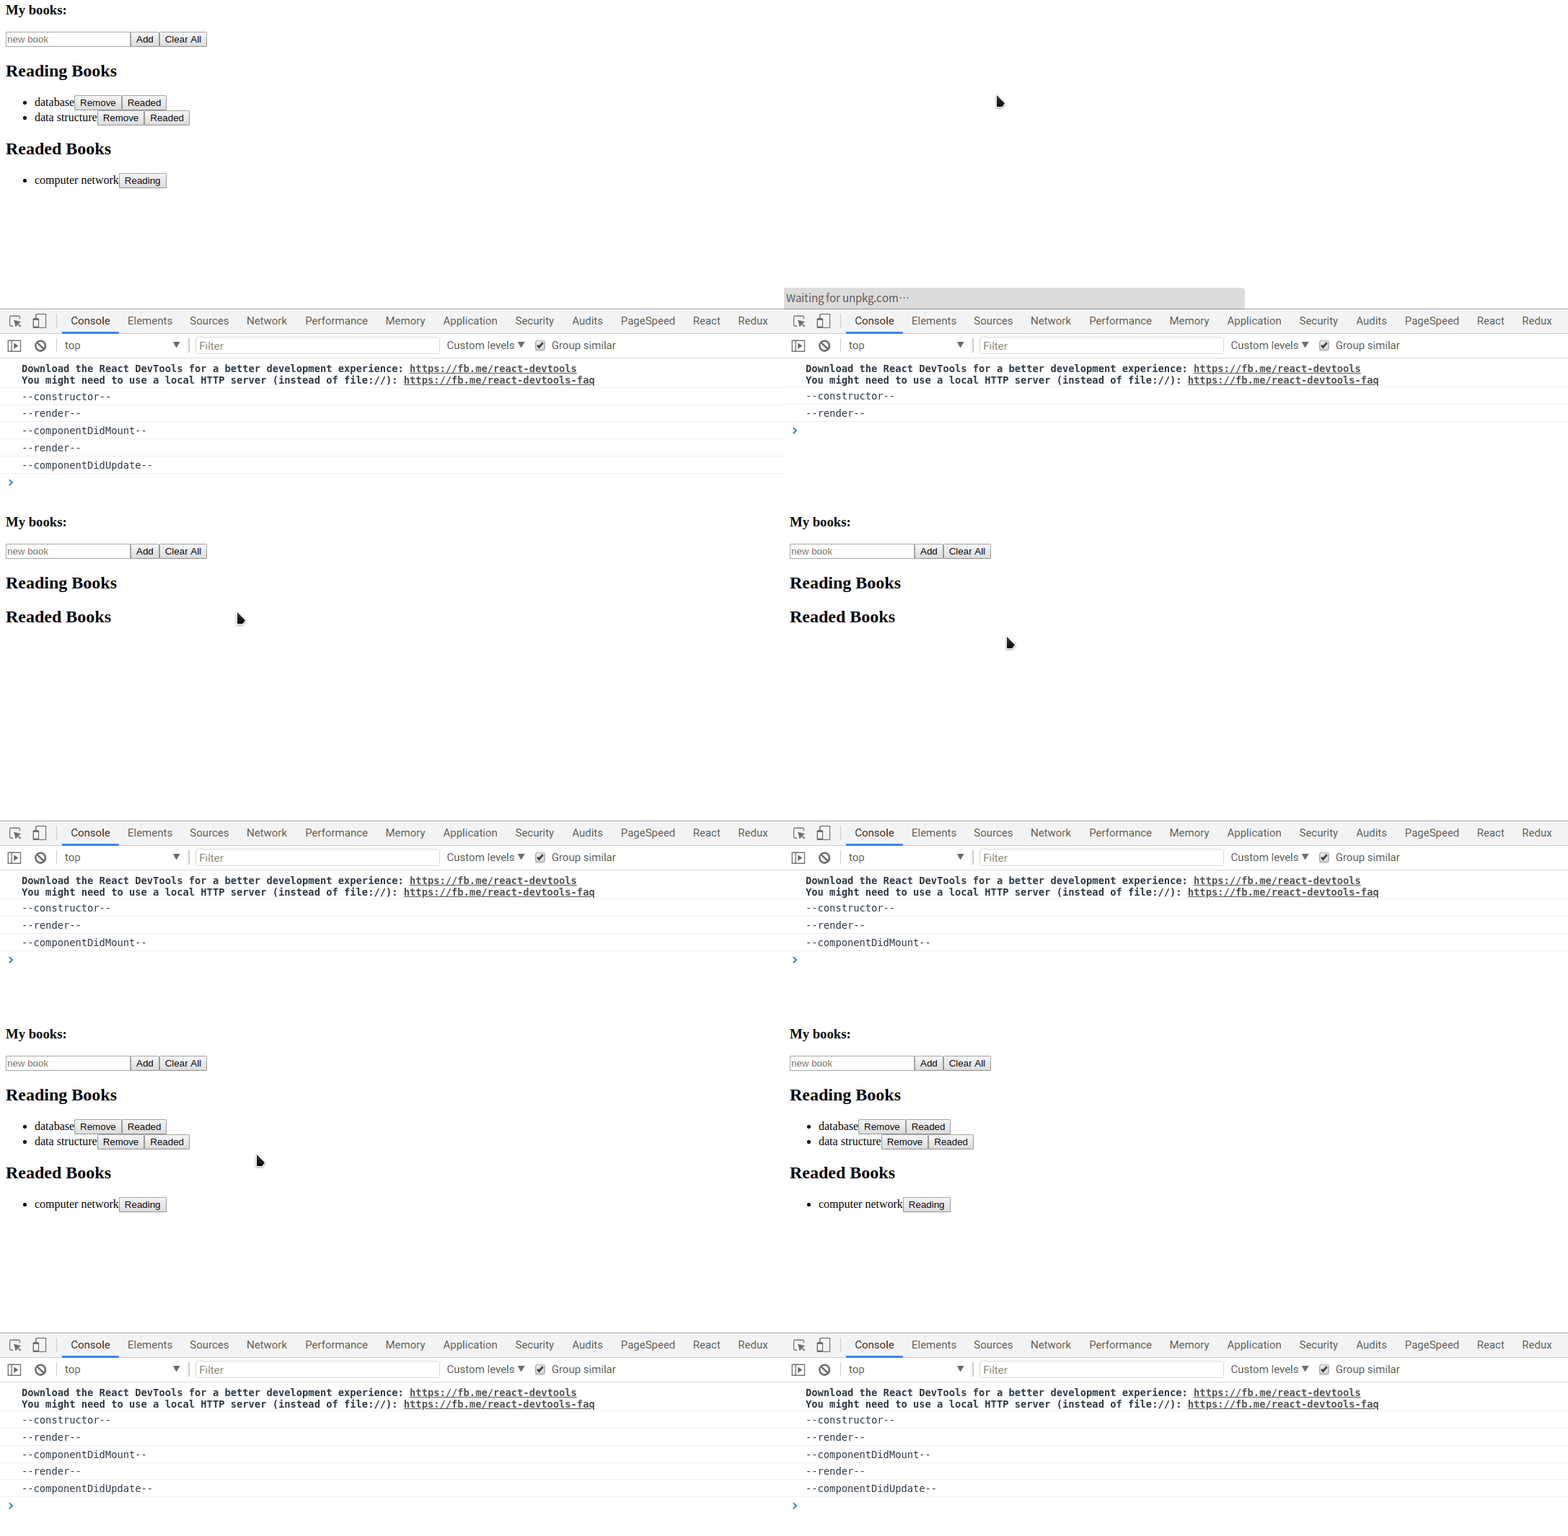
We can see that after componentDidMount, we request data, and then render re-renders and executes componentDidUpdate.
Let's enhance the user experience by adding loading logic:
class App extends React.Component {
  constructor (props) {
    super(props)
    this.state = {
      books: [],
      loading: true,
      input: ''
    }

    ......

    console.log('--constructor--')
  }

  componentDidMount () {
    console.log('--componentDidMount--')

    API.fetchBooks()
      .then(books => {
        this.setState({
          books,
          loading: false
        })
      })
  }

  componentDidUpdate () {
    console.log('--componentDidUpdate--')
  }

  componentWillUnmount () {
    console.log('--componentWillUnmount--')
  }

  ......

  render () {
    console.log('--render--')

    if (this.state.loading === true) {
      return <h2>Loading...</h2>
    }

    return (
      ......
    )
  }
}
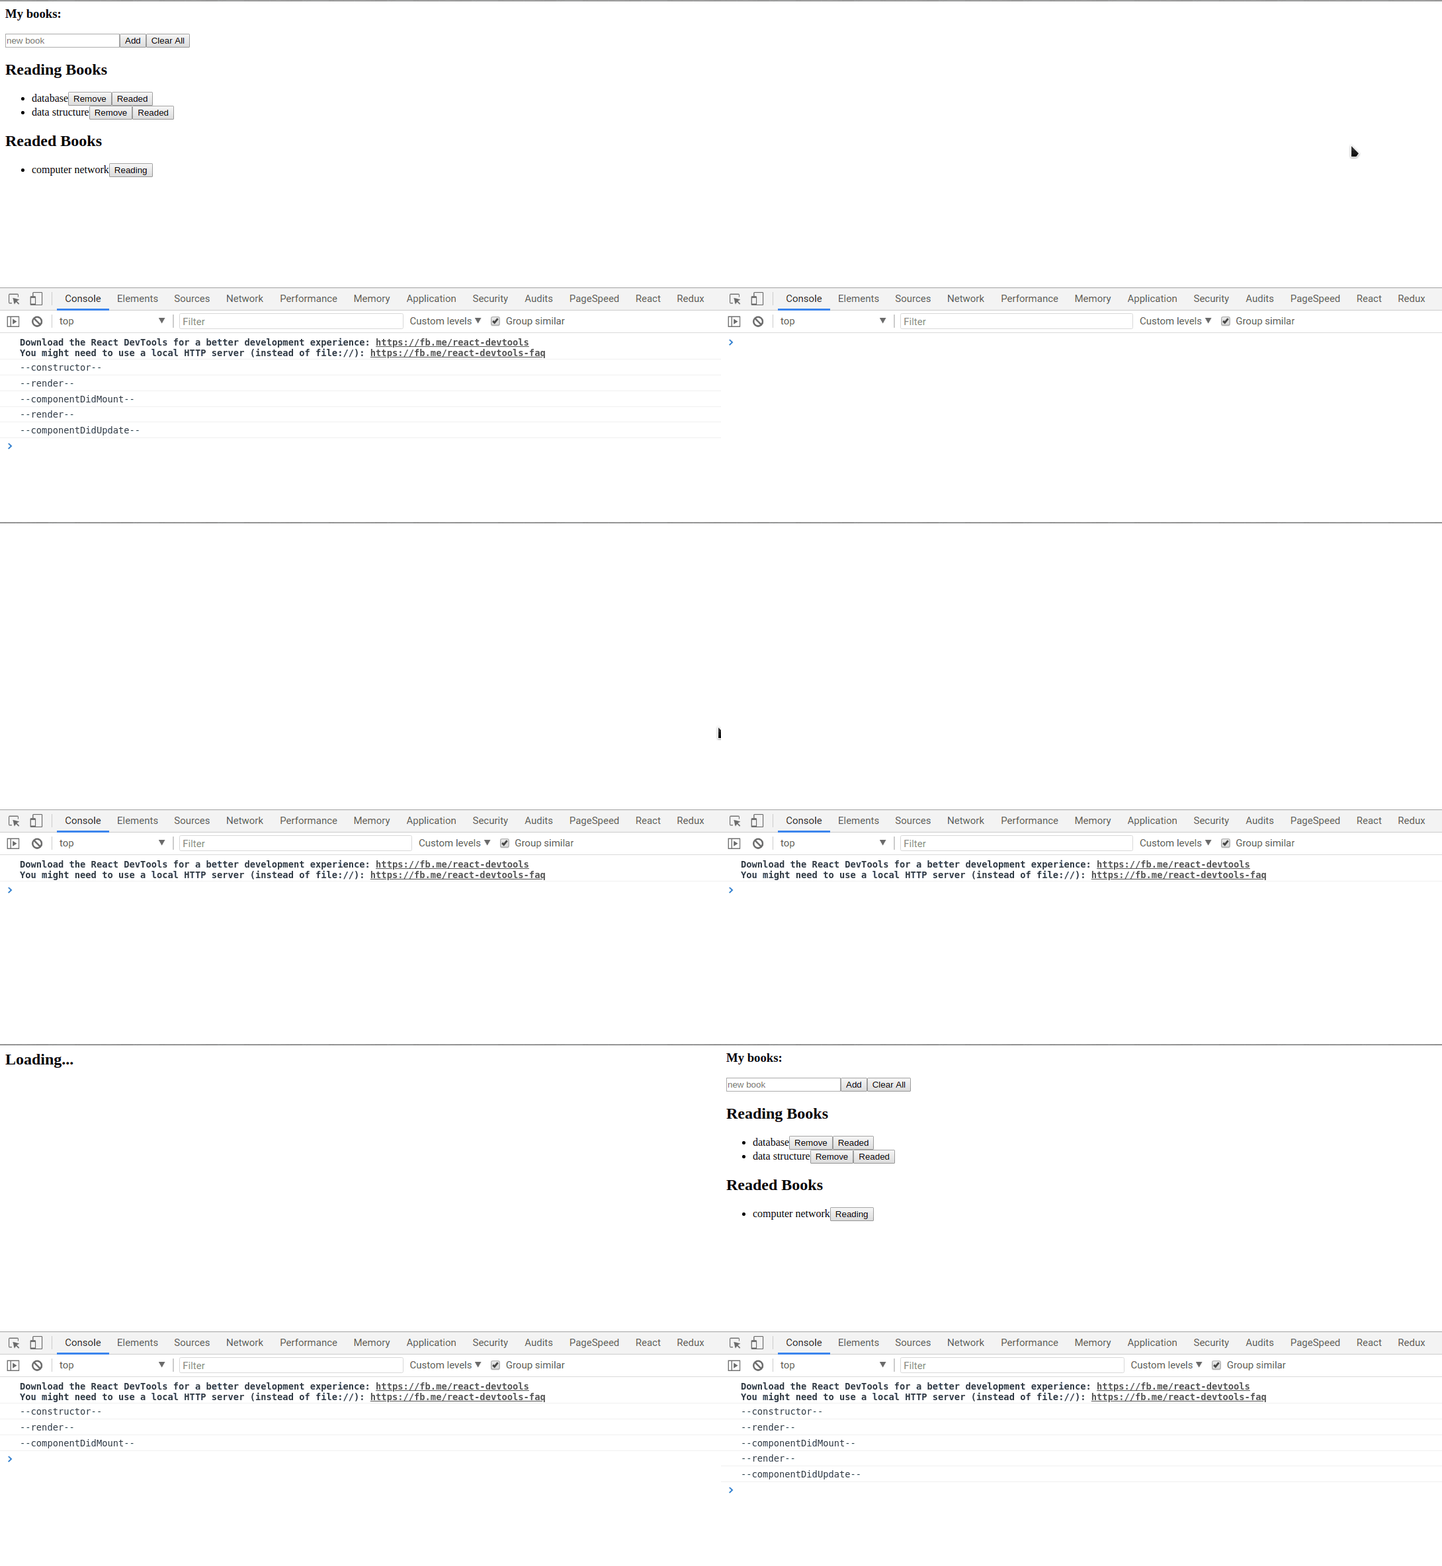
OK! Now our entire introduction to React journey has come to an end. Of course, we have not fully achieved the preview effect, but I encourage you to further independently encapsulate a Loading component. Finally, let's briefly discuss further development operations.
More#
Scaffolding#
Our introductory tutorial uses the traditional external link method to use React, and to use JSX, we also need to introduce Babel. Modern web development processes are based on Webpack for modular building and deployment. For actual projects, it is generally recommended to use the official scaffolding create-react-app to build in one step, simplifying the dependency installation and environment deployment process, and focusing more on writing code logic.
State Management and Routing#
Do you remember the definition of React? It only focuses on building user interfaces. Although we can manage a certain internal state through class components, when the project becomes complex to a certain extent, it is inevitable to introduce external state management libraries. Here, it is recommended to use Redux which aligns with React's philosophy; modern single-page applications require routing management, and React-Router is recommended.
Finally, I want to say that while front-end technology seems to be developing rapidly, the underlying principles are fundamentally consistent. React brings a new revolutionary development approach, and I hope you take this as a starting point to delve into its more features in line with React's design philosophy.